LATEST RELEASE: BetaMatch version 3.4.0 - Get it here!

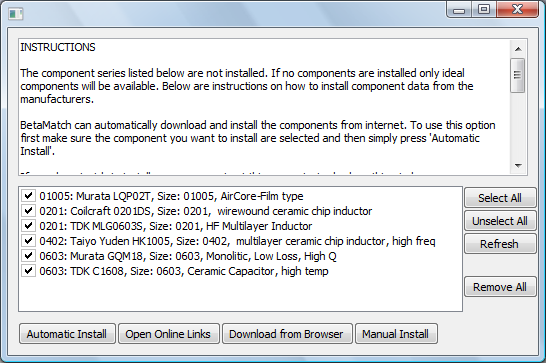
If there are supported components that are not installed (for instance when BetaMatch is run for the first time on a computer) a window will be shown with a list of all component series that can be installed. This window can also be opened from Circuit –> Install Components Menu.
If you have uninstalled components and do not want this window to show at startup you can turn it off by unticking Show “Install Components Window” if not all component series are installed. in Tools –> Options...
Note that from BetaMatch version 3.3 components from Murata and Coilcraft always are included and does not need to be installed separately.
The easiest way to install components is to use the automatic installation described below.
Short Description:
The recommended (and easiest) way to proceed is to click the Automatic Install button. This will download all components from the vendors web-site and install them for use with BetaMatch. The download will take place in the background and will not block BetaMatch.
If there are components that you do not wish to install just make sure that they are not ticked.
During the download the window will show current status. There is also a button to abort the download if needed.
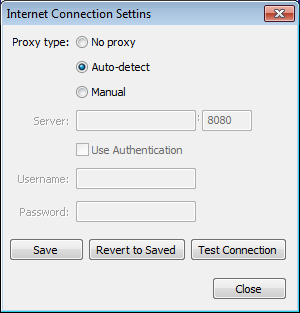
Of course this only works if the computer is connected to the internet and if no firewalls etc. is preventing BetaMatch from going online. If there is a problem with the internet connection a window will pop up:

Click yes to open the Internet Settings dialog where you can enter credentials and also test the settings. The Internet Settings can also be set in the Connection tab in the Tools –> Options... window.
Note
BetaMatch will default to a set of ideal inductors and capacitors if no components are installed. Even if ideal components have their use, they are often not good enough to be used to design real matching networks. For that job component data based on 2-port measurements will give much better results.
If you experience problem with the automatic download, the computer does not have an Internet connection or you just do not want BetaMatch to download from Internet it is possible to do a manual installation:
1. Download the desired files from the vendors web-site:
Pressing the ‘Open Online Links’ button will open the web page Supported component series where there are links to all supported components.
Alternatively you can select the series you wish to download in the window and press the ‘Download from Browser’ button. This will open the download locations directly in your browser. Note that one separate tab (or window) will be opened for each file to download. That means that quite a number of tabs/windows may be opened if many components are selected. In your browser use the ‘Save’ option to download each file.
Once the files are downloaded there is no need to extract any compressed files (eg zip-files).
2. Install the downloaded files:
Select the files and then drag them onto the ‘Install Component Window’ (or on the BetaMatch main window) and drop them. The components will be automatically installed from the zip-files.
Instead of ‘Dragging and dropping’ the files you can select Manual Install and select the files you want to install from an ‘Open File Dialog’ (note that you can select more than one file dialog).
The Refresh Button is used to do a new check of which component series are installed. This may be needed if some component files have been manually deleted.
If some components doesn’t install correctly or the database seems to be corrupt, everything can be removed with the Remove All button. This will give a clean start to start over again with the installation. Note that this means that all data that has been downloaded with the automatic function will need to be downloaded again.
Note
Ongoing downloads will continue in the background even if the Install Components Window is closed. It is not possible to close the whole BetaMatch application while downloading is in progress. Trying to do so will give an error message. Instead, wait for the installation to finish or open the Install Window and abort the downloads before closing.
A component series to use in the matching network consists of a series of capacitors, a series of inductors and either a short or an open component (short for a component that is in series position and open for a component that is in shunt position).
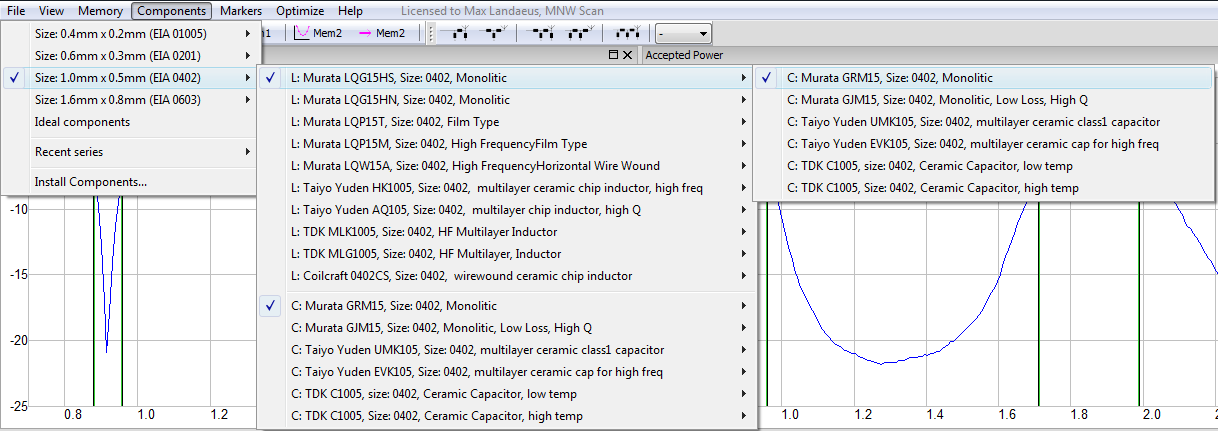
Component series can either be selected globally from the Components Menu or individually for each component.
Selecting Global Component Series
The global components to use are selected from the Components Menu . In the menu there are options for different sizes. Each option has a sub-menu where all inductors (L) and capacitors (C) are listed. For each of these there is a sub-sub-menu (with capacitors under the inductors and inductors under the capacitors). This means that both capacitors and inductors are selected at the same time.
There is also an entry to select Ideal components. This will select values according to the E24-series.
The most recent selections (combinations of L and C) can be quickly selected from the Recent series option.
Changing the global component series will reset the matching network to Open and Short. Components with individual component series will be changed to the global component series.
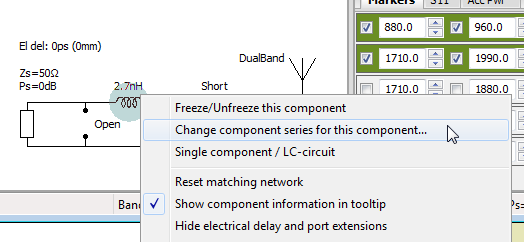
Selecting Series for Individual Components
It is possible to have different component series for different positions in the matching network. To change an individual component move the cursor so the component is selected (surrounded by a blue circle), right click and from the context menu select Change component series for this component... (see figure below). A menu similar to the main Components Menu will be displayed where the component series can be selected in the same way as for the global component series.
A component where the component series is different from the globally selected series will have the component value printed in italic to distinguish it from the other components.
Changing an individual component series will reset the matching network. All components will either take the value Open or Short.
Note